Godot Jenkins CI
Bare minimum steps to run Godot builds in Jenkins and upload to Itch.io
Introduction
If you just want the finished pipeline you’ll find it at the end of this article.
I’ll be honest I just got started with Godot 4.5 a week ago and I can’t seem to put it down. After primarily using Unreal
for a decade it’s a real breath of fresh air. Let’s not make this a Godot vs Unreal kinda article though.
That will come later.
I wanted to figure out how to use Jenkins to make builds and upload them to itch.io. Godot’s internal documentation is excellent, but I was missing a really bare-bones example on how to just plug and play. Well this is that.
Build
This article focuses on windows, but thankfully all platforms seem to be handled rather similar by the engine. First of all you need a Godot installation. To keep it simple add the installation folder to PATH and rename the engine to Godot.exe.
Next you need to install the export templates. Ideally you have already done that once to make local builds. If not follow this page in the documentation: https://docs.godotengine.org/en/latest/tutorials/export/exporting_projects.html
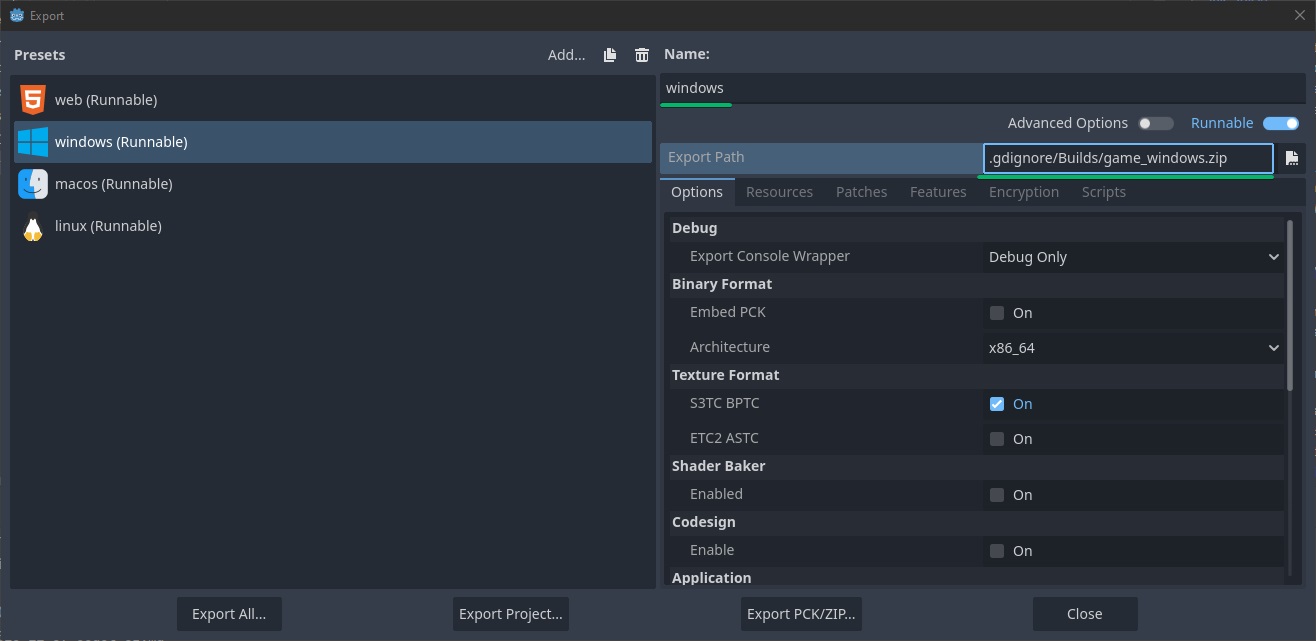
You’ll end up with the configurations for builds. In this case the Windows one is simply titled windows and exports to .gdignore/Builds/game_windows.zip. These two entries are really all that are needed for the pipeline.
You can now make a build by simply calling
Godot.exe --headless --path "path/to/project/folder" --export-release windows
| Argument | Purpose |
|---|---|
| headless | (Optional) Runs the engine without the display server, in case the CI node has no gpu |
| path | Path to the folder where the project.godot file is in |
| export-release | Shipping configuration, export-debug is also possible |
| windows | The name of the export configuration, be sure is the same as in the UI |
You can use this for each export configuration.
Deploy
This takes care of building, now onto uploading. You need to install itch’s deployment tool butler and make sure it is authenticated. Save the auth in an environment variable named BUTLER_API_KEY.
With that the build can be uploaded like so:
butler.exe push "path/to/project/folder/.gdignore/Builds/game_windows.zip" username/game-name:windows
| Argument | Purpose |
|---|---|
| push | Tells butler to upload a folder or file |
| username | The username that is authenticated |
| game-name | The identifier of the game |
| windows | Channel name to push build to (see docs) |
Finished Pipeline
All that’s left is package the previous calls into a standard jenkins pipeline. Note that the path/to/project/folder has been replaced with the WORKSPACE variable.
pipeline {
    agent any
    stages {
        stage('Build') {
            steps {
                bat "Godot.exe --headless --path \"${WORKSPACE}\" --export-release windows"
            }
        }
        stage('Deploy') {
            steps {
                bat "butler.exe push \"${WORKSPACE}/.gdignore/Builds/game_windows.zip\" username/game-name:windows"
            }
        }
    }
}
